After my first ever attempt at a thru hike (read about it here), I learned a number of important lessons that will change the way I do backpacking moving forward. Here are some of the big lessons I learned.


The reason for this upgrade is that I believe this thicker cordage will be easier to get items in and out of it and it should also last longer. I had a Gossamer Gear Thinlight pad that I strapped at the bottom of the pack on the OT and it was difficult to get in and out of the straps sometimes. It also felt like that thin cord might snap sometimes. I don't think I will need to worry about this cord. The black color will also not look as dirty as the white did.
I was a little disappointed in other Smartwool items as well. The boxers I wore showed more wear than I would have expected over the course of a nine day trip and Smartwool shirt got holes in it. They just were not as rugged as I would have hoped. These items were at least comfortable and they kept me warm and dry, so that's good.
 Here is a link.
I expected my body and clothes to stink on this trip. I didn't expect my pack to smell like that.

3-4 Days on the trail at a time is enough for me
I like being in the woods, but I was ready to be done after four days on the trail. I'm not a thru hiker. I don't think I will ever do another long thru hike that requires resupplies and puts me on a trail for more than a week. I've satisfied my interest and curiosity in doing a thru hike and it's not for me. It was too long away from my wife. It was too hard on my body. I can do long days with big miles for a few days, but I need a break after that. I don't like doing shorter mileage days because I get bored at camp. I like to be on the move. The food gets boring to me after a few days as well. You have to eat on the trail, but meal after meal of freeze dried or bars and trail mix gets old.
Dry Camping isn't so bad
Dry camping is when you don't have ready access to a water source where you are camped for the night. I have been avoiding dry camping after a negative experience last March. The key is to really "camel up" by drinking as much as you can (I've been drinking about a 1.5-2 liters) while you are at the water source before you leave the water source, then also filling up your water bottles and dirty bag too, depending on how long it will be till you get to the next water source the following day. I have learned a lot about looking ahead on the trail to figure out what water sources lie ahead. That makes a big difference.
One advantage of dry camping is that you are typically up at a higher elevation and you will sleep drier and warmer (provided the wind isn't too strong). Valleys, where you frequently find campsites with water access, are often colder and tend to have more condensation, especially if you are tent camping. On my OT hike, the one night I tent camped near a river, my filter bag got icy while I filtered in the morning and the inside of my tent was dripping with condensation.
Long days are hard to sustain
I can do 17-20 miles days on the trail. I like the physical challenge of those long miles. I like the limited time spent at camp, and I like the fact that sleep is easier when I've been walking for those long hours. However, day after day after day, that wears on the body.
Go slower on rocky descents
After difficult climbs up to the tops of the mountains where I had to go slower because of the physical demand, I wanted to cruise down the descents. On rocky slopes where the rocks sometimes rolled when I stepped or my foot slipped because of leaves, or wet moss, my toes paid a high price and took a beating. If I had gone more slowly on those downhill slopes, I think I would have done better for my feet.
Gear/items I should have brought, but didn't
Sunscreen
On the OT, you are primarily walking in an eastward direction. The mountain ridges in the Ouachitas run east to west (uncommon for mountains in the US). The day that I hiked from the Kiamichi Valley to Queen Wilhelmina State Park, the right side of my face was exposed to the sun for several hours as I walked along the top of Rich Mountain and I got more sun exposure than I should have. I bought a small bottle of sun screen at QW and started using it on the trail after that. I didn't get sunburn that day, but it was only a half day on the trail and if I had needed to continue on, I'm sure I would have gotten a burn.
Emergency Blanket
These mylar blankets weigh next to nothing, but they can make a difference in keeping you warm and safe. Because they are reflective, they can be used to signal rescue crews who are looking for you. You can wrap yourself up like a burrito in the blanket and amplify the insulating properties of your sleeping bag or quilt. They can also help insulate you from cold ground in case your inflatable sleeping pad gets a hole. This is something I learned from Andy and Tater on the trail.
Short lengths of cord
Having a few shorter lengths of cord can be very useful. Andy used a couple of cords like this to help lash tarps at the shelters, to hang a gravity filter setup, and various other applications. I've always kept cordage in my pack, but I figured having 30-50 feet of cord could always be used in smaller bits and just let the rest of the cord you aren't using hang free. This limits what you can do with the long cord and it's also less convenient to have that much long cord hanging when you only need a couple feet of cord to lash or hang something.
Gear I will be upgrading
Bear Hang kit
When you're on trail you need to hang your food and anything else with fragrance that might attract curious or hungry critters. To hang your food properly, you need to find a tree with a branch that will allow you to throw a cord over it, then hoist your food bag up high enough that a bear won't be able to play piñata with it. Up to this point, I have always just used super cheap cordage and tied the end to a rock that I can use to throw over the tree limb. On this trip, Tater had an upgraded cord and a bag for rocks that she could just fill with one or more small rocks or gravel, then clip the bag to her line with a carabiner and throw the bag up and over the tree limb.
Tater's cordage was slick and less inclined to twisting up than my cord, so it didn't get hung up on the tree branches as much. I also found that it was harder to find decent sized rocks in some locations. And even when I did find a good rock to tie off, the knots I use have a release because I want to be able to undo the knot. When my line got hung up, sometimes the rock would come untied and go crashing to the ground. If the end of the line that was attached to the rock was hung up too high for me to reach in order to attach my food bag, it meant that I would have to pull it back down, retie the rock and start over.
Bungy Cordage on my Pack
When I first got my Durston backpack, I added bungy cord to lash items to the outside of the pack. This has been very useful to me. At that time, I didn't go out and buy new bungy. I just used some white thin shock cord that I have had sitting around since, who knows when. It worked, but I decided to upgrade to some bungy that was thicker and a bit more robust.
 |
| First bungy, worked, but super thin. |
 |
| New bungy, more robust |
The reason for this upgrade is that I believe this thicker cordage will be easier to get items in and out of it and it should also last longer. I had a Gossamer Gear Thinlight pad that I strapped at the bottom of the pack on the OT and it was difficult to get in and out of the straps sometimes. It also felt like that thin cord might snap sometimes. I don't think I will need to worry about this cord. The black color will also not look as dirty as the white did.
Smartwool neck gaiter (and other Smartwool items)
I purchased a Smartwool neck gaiter back in February. This was really the first time I've used it because most of the year, it was too warm to need it. It was tight. I have a large nose. On the coldest nights, I wanted to pull the gaiter up over my mouth and nose to keep them warm. The gaiter was putting pressure on my nose and it was uncomfortable. Also, the logo has started to peal off. Smartwool is a premium brand, but I don't think this is a premium product. It was too stiff and too tight to make it a comfortable option.
 |
| Logo pealing off |
I was a little disappointed in other Smartwool items as well. The boxers I wore showed more wear than I would have expected over the course of a nine day trip and Smartwool shirt got holes in it. They just were not as rugged as I would have hoped. These items were at least comfortable and they kept me warm and dry, so that's good.
Gear I brought, but ended up sending home
These are items I started the trail carrying, but that I ended up sending home because I determined they were not worth the weight to carry after I reached my resupply point at Queen Wilhelmina.
Trail Maps
The detailed topographical trail maps are nice tools. There might be some circumstances where having the map to consult might be useful (e.g. if there was an unexpected flood that made the trail unpassable and I wanted to navigate around it), but on the OT, there are almost always alternatives. You're usually not too far from a road, either to the north or south of the trail, or you can backtrack to a road. The maps are coated to make them waterproof, but that coating also makes them heavy. I sent the maps for the first and second section home at QW and I didn't regret it.
The maps were useful to me while planning my trip. They helped me to see the distance between points as well as the elevation changes on the trail. But on trail, I found them unnecessary and extra weight.
Sandals
I thought it would be handy to have sandals at camp, especially if my shoes got wet during the day. The sandals I brought were Teva's and they weigh nearly a pound together. I didn't use them once on trail. I shipped them home and was glad to be relieved of their extra weight.
Compass
Like the maps, I never needed my compass. There are undoubtedly trails where not having a compass would be ill-advised, but on the OT, even if both my phone and GPS failed me, I don't feel like I would have been in serious trouble on this trail. My compass doesn't weigh that much, but it was one less thing to carry in my pack.
Spare socks
For the first section of the trail, from Talimena to Queen Wilhelmina, I wore a thicker pair of Injinji toe socks. I was also carrying a pair of thin Injinji toe sock liners and a pair of Darn Tough wool socks. At QW, I decided to ship the thicker Injinjis home and to go with the combination of liners and Darn Tough socks. I think this combination may have given me a little extra padding and protection, though the truly rough trail was behind me at this point. The socks weren't heavy, but again, one less thing to carry.
Food lessons
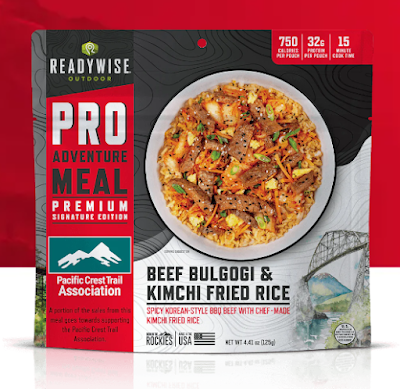
At home, I love Asian food. If I could eat Chinese, Indian, Japanese, Thai, etc every day of the week, I think I would do it. The freeze dried versions of these foods are not as good. I found them disappointing.
There was one exception.

Other than that Beef Bulgogi meal, the options I liked best were the simpler home cooking type meals. There are a few meals I still haven't tried that I'm interested to find out if I like them or not, but Beef Stroganoff from Mountain House and Peak Refuel Chicken Pesto Pasta were also good.
Notably bad meals
Notably bad meals
Alpine Aire Kung Pao Chicken. I had to force myself to eat that meal. The flavor was just not good. It didn't taste like any Kung Pao I have ever had and the peanuts in it had an odd texture. I wanted to like it, but it was gross.
Peak Refuel Biscuits and Gravy. I'm not huge on biscuits and gravy to begin with, but I've grown a bit more fond of them over the years of living in the south. The biscuits never fully hydrated in the middle. It was like eating a somewhat soggy biscuit with a crunchy center. I even tried cutting the biscuits in half, then waiting longer hoping that they would soften, but that didn't even work. I'm sure it made it better than it would have been, but I won't be buying this mean ever again.
I also got bored with egg based freeze dried meals for breakfast. I eat eggs for breakfast at home frequently, but even when I mixed up the types of breakfast blends, it got old pretty fast. On the final morning, I was so ready for a change, I ate a couple of breakfast bars instead of cooking.
I will try the other meals I have already purchased. But I will also mix up my breakfast options more than I did on this trip with some breakfast bars, maybe some oatmeal, and I also had a packet of hot chocolate one cold morning that I enjoyed.
Surprising stench
One last thing I will mention here is how stinky my backpack got. I have worn it on trips before this and some of them have been in warm or even hot weather. But I have never finished a trip and found my pack so rank as it was after this trip. My backpack is the Durston Kakwa 55. The material it's made of feels almost like a plastic fabric. When I got to QW, it was already smelling over-ripe. I tried to give it a rinse in the shower, but it didn't do much good. By the end of day nine, it was utterly repellant. At home, I let it soak in the bathtub with some laundry detergent. The water was grimy. I let it hang on the clothesline after I finished soaking and washing it. It smells 100% better now.
 |
| Disgusting |
 |
| UV rays FTW |
I expected my body and clothes to stink on this trip. I didn't expect my pack to smell like that.
Sleeping Pad Failure and Repair
I had my first ever sleeping pad failure on this trip. This was also the coldest temperatures I have ever camped in.
- The first thing I learned is that I was still able to get enough sleep, even when I was essentially lying on hard ground. The sleeping pad still provided some measure of insulation, even when it was deflated.
- It's difficult to do a proper repair in the field with anything more than a pinhole puncture because the repair of larger hole requires fabric patches and the fabric patches require adhesive that is not included in the repair kit as well as 24-48 hours for the adhesive to set up.
- The "Patch Kit" that was included with my sleeping pad does not include adhesive for the larger fabric patches.
- Tape patches are better than nothing, and you can blow into the pad in the night to re-inflate when the pad leaks and gets low. Tenacious Tape is what I used at Queen Wilhelmina. It seemed to hold while I was there, but the first night on the trail, it started to leak. I got along okay for the remaining days by re-inflating in the night. Most of the time it only took 3-4 breaths because it wasn't completely deflated.
The puncture hole in my pad is about an inch long, so it's been difficult to fix. I tried using one type of adhesive since I returned home, but I don't think it's the best adhesive. I have another adhesive ordered and it should arrive today. Hopefully I will be able to remove the previous patch attempt and start over with this new adhesive. If this works, I may do a short article where I provide details about what worked and what did not work to repair the pad.
I would also like to add that I don't blame the pad for this failure. I was using the Nemo Tensor. It's a good pad. Light weight, packs small, and it kept me warm, even after I poked a hole in it. The hole was caused because I had my CNOC bag in my quilt with me to prevent it from freezing when the overnight temperature dipped to 26° F. That would have been fine if I had just put the CNOC down in the footbox of my quilt, but instead, I had it up near my thighs and, getting out of bed to use the bathroom in the night, my leg pressed down on the clip at the top of the CNOC, which caused the puncture. It was a rookie mistake.
I think this wraps up the major lessons learned on this trip. In a future post, I will write about my favorite gear on this trip. These will be items that worked dependably and without problems or fuss and that I will definitely be taking with me on future trips.
One other post I have planned related to this trip is an FAQ page. People often ask basic questions about a backpacking trip like this. I will respond to some of those questions. If you have questions you would like to know the answers to, you can ask here or send me a message.
As always, thanks for stopping by,
Gavagai
Gavagai

Comments
Post a Comment