Outside Magazine's "How to Pack" Video: Reactions and Thoughts
on
Get link
Facebook
X
Pinterest
Email
Other Apps
The YouTube algorithm brought this video from Outside Magazine into my feed.
I decided I wanted to write an article to talk about a few things.
**Disclaimer: If you are an experienced backpacker, none of what follows is likely to be news to you.**
First, there are things I do when packing my pack that are similar, but also some things I do that are different, and I think it's worth talking about why I do what I do when I pack my backpack.
Second, watching the video, I was thinking "this guy gets all his gear from REI". That's not necessarily a terrible thing, but there are some good alternatives, but when I read a couple of comments about how none of his gear was fancy, I decided I wanted to make some comments about the gear and why I don't use some of the things he is using and what I use instead. There are some affordable (in some cases considerably less expensive), lighter weight, and sometimes options that are made in the US.
How and Why I Pack Differently
Pack Liner
One of the biggest differences in the way I pack is that I use an internal pack liner bag to keep anything that needs to be dry, dry. I have used a trash compactor bag and also Nylofume liner bags. Both do the job just fine. They Nylofume bags do it with less weight (about half the weight), but they are not as tough as the trash compactor bags.
Given that the bottom of my bag is a dry compartment, everything that goes into that compartment is gear that necessarily must remain dry. So, my sleep system, set of dry clothes for camp, and my electronics bag go in the liner bag. Those items are also compressible, and they are the last items I need when I get to camp. They don't come out until my shelter is set up and ready. The compressible part of putting all those items in the same space also makes better use of the space. It appears that the OMG has a roll top dry bag for his sleeping bag. That one bag probably weighs more than my Nylofume bag and a trash compactor bag together. It also makes your sleeping bag (or preferably a quilt, but I'll say more about that later) into a ball that will create gaps in your pack. This is a less efficient use of space, it's heavier, and leaves other items that you also need to keep dry (potentially) exposed to moisture. You could put those other items into a separate dry bag, but now you're compounding the problem of added weight and more bubbles of unused space.
In cold weather, I also have a down puffy jacket that goes inside the bag liner. Anything that is down needs to stay dry. Wet down won't keep you warm. As far as I can tell, OMG is relying on his backpack to keep his jacket dry. Maybe his puffy jacket has synthetic insulation, so it will still insulate if it gets wet, but if so, that's a point worth mentioning, and he doesn't. I have never worn my puffy on trail. Even if it is 40° when I am starting in the morning, within 20 minutes of hiking, I would be overheated and ready to take that layer off. Better to start a little cold with a mid-layer on so you don't get sweaty. Keep your body dry.
Once the dry items are all loaded into the liner bag, I compress it all down as far as I can mash it, letting the air out through a gap in the top, then I give the opening a couple of twists and tuck it into the side.
Top of the Pack Inside
The next items I load are usually my toiletries bag, my miscellaneous items ditty bag, my stove (on its side, so the fuel cannister that is stowed inside doesn't rattle with every step I take for the next ten miles), and my food bag. I typically pack a couple of quick snacks in my hip belt pocket, but I don't put an entire lunch meal in an outside pocket. Keeping my food bag on top means I don't have to dig too far for it when I stop for lunch. I don't cook for lunch, so my stove and pot don't need to be on top. I rarely need my ditty bag contents until I'm at camp, so they can be under the food as well.
There are a few things that change or are changing regarding the last items I load because of my hammock setup. I will put my hammock and under quilt inside the liner bag to keep them dry. The tarp can fit easily inside with the ditty bags, cook kit, and food on top. OMG puts his cook kit on top of his food. Maybe he cooks his lunch. My lunches consist of beef sticks or beef jerky, some crackers and cheese, and maybe a cheese stick. If it's my first day on the trail, I might have smuggled an apple with me as well, but apples are heavy, so I don't bring multiple.
With a multi-day food carry, my tent may not fit inside the pack. If I can't close the pack with my tent inside, I close the pack and strap my tent on top. OMG's pack has a "brain", a sort of a lid with some storage inside. My pack does not have a brain, but it has lashing straps to which I can lash my tent, an extra layer, occasionally a bladder (see the Water Filter System section below) of water if I have a long stretch of trail with no water source, or I have to dry camp where I have no easy access to water.
Outside Pockets
The large front pocket on the outside of my pack holds my first aid kit, my water filter kit, my rain gear, and my poop kit. These are all things I want quick access to while I'm on trail without having to open or dig around in my pack.
I have side pockets near my hips. This is where I keep my water bottles. I like always having my water within reach while I'm hiking. My spreader bars for my bridge hammock also go in one of the side pockets. My tent uses trekking poles instead of tent poles, so I don't need tent poles.
OMG packs his tent with poles inside his pack. If I were using a tent with poles, I would separate the poles from the tent. His stuff sack for the tent was long with the poles, which means he had to put it into his pack vertically. Without the poles, I would wager, he could cram the tent into the pack more easily and with better space efficiency, then put his tent poles in the side pockets and use the side compression straps to help keep the poles in place. It doesn't matter if your poles get wet. That won't harm the poles and it will make packing your backpack much easier. Without the poles in that tent bag, he can probably also lay his tent horizontally, again making better use of the space inside the pack.
OMG states that your trekking poles "should be in your hands at all times". I love my trekking poles, and I used them almost constantly while I'm on trail. However, I would not go so far as to say they should always be in your hands. There are boulder fields on some trails where you have to scramble, meaning use your hands and feet to climb up and over the boulders. In those circumstances, trekking poles just get in the way. There are times when I'm using my phone for communication, navigation, or just entertainment (I frequently listen to podcasts and music while hiking). If I reach for my water to take a drink, I have to put my pole somewhere to free up at least one hand. I don't typically put it on my pack when I do this, but I do set them down at times or hold both poles in one arm to free up my hands while I am adjusting things or just doing something. Trekking poles are super helpful to improve your balance, to catch yourself if you lose your balance or footing, and they can take some strain and pressure off your legs and knees, especially when descending mountains. But like anything, there are times and places where you don't need them and other times and places where you are better off (if momentarily) without them in your hands.
OMG Gear
I suppose Outside Magazine gets ad revenue from the big companies, so it's not super surprising that the gear that is shown in their video is all from big backpacking brands. Having said that, there are a lot of quality, affordable, and lighter weight options than the gear shown. And this comment in particular...
...made me feel a little twitchy. I had to respond.
The Pack
Osprey packs are quality packs, and they are comfortable. There are definite advantages to buying an Osprey pack over an ultralite pack. However, they are as expensive or more expensive than some of the alternatives, they have more bells and whistles (...i.e. fancier) than ultralite packs, and in my opinion, they aren't better made. Let's compare the specs on OMG's pack versus the pack I use.
OMG is using an Osprey Atmos, I'm guessing a 65 liter version. They cost $340 on REI. The small size weighs 4 lbs 10 oz.
The Durston Kakwa 55 costs $260 and the small size pack weighs 1.9 lbs, rounding up.
Both are well made. Both are from reputable companies. The Durston probably won't carry heavier loads as comfortably as the Osprey, but you can cut weight and probably still save money on other items so that you can use the Durston instead of a more traditional pack like the Osprey.
The Cook Kit
OMG's cook kit is fancy gear. It's an all-in-one Jetboil type stove/pot. They are expensive and they are heavier than some decent alternatives. I use a BRS 3000T stove and a Toaks 750 Titanium pot. Total weight: 5.1 oz, including a mini-Bic lighter. Combined cost: $46, and you can find them on sale.
Toaks 750 ml pot
BRS 300T Stove Mounted on fuel cannister
BRS 3000T folded
The Jetboil costs $99.95 and weighs 11.75 oz. The advantage of the Jetboil design is that it performs better in windy conditions and boils faster, but I can't justify that extra expense and weight. I will watch my pot for an extra minute and maybe shield it from the wind with my body, my food bag, and/or a tarp if I need to.
Jetboil
The Sleeping Bag
I don't know for sure, but it appears that OMG is using a mummy bag. They don't show it and it's impossible to tell the brand, but it looks large, even in his compression/dry bag. I'm going to use an REI brand 30° Magma 850 down filled bag for comparison versus the quilt that I use, a UGQ Bandit 850 down top quilt. Mummy bags have down insulation on your whole backside which, when you're lying in the bag, does next to nothing to keep you warm because it's compressed. It's extra weight with little to no payoff. They are also very restricting to sleep in unless you only sleep on your back. As soon as you roll on your side, there is a hood in your face. If it is cold and you are breathing into that hood, the moisture from your breath will condense quickly and your sleeping bag hood is going to be wet.
The REI Magma 30° bag costs $379 and the wide/long version weighs 1 lb 12 oz.
REI Coop Magma 30
A wide long 30° UGQ Bandit quilt costs around $320, even with some extra bells and whistles like a zip close footbox that you can open if the weather is warmer so you can vent your feet. It weighs 1 lb 6 oz for the wide/long. These quilts can also be strapped to your sleeping pad so you can sleep on your side or even your stomach and roll back and forth and the quilt stays in place. The fact that you can vent your feet (if you opt for the zipper footbox option) is also an awesome feature in my view. It means you can use your quilt in a much greater range of temperatures than you could otherwise.
UGQ Bandit: Top side on left, backside on right
UGQ is a US based company, and their quilts are very customizable. There is a bit of a lead time for them to make your quilt after you place your order, so you can't just buy one and run out to the trail. But if you can wait that little bit, I think it's a far superior option that is lighter weight, less expensive, and will give you a better night of sleep on the trail.
It's interesting, OMG also throws a bag liner into his pack. I use a bag liner when the nights will be too warm for a quilt. I know some people supplement their insulation with a liner, but to me, supplement with extra layers of clothing or an emergency blanket (which weighs a couple of ounces). He's adding probably close to another pound of weight into his pack with the liner, and it's not in a water-proof sack, so if it gets wet, it's not going to keep him warm anyway.
The Sleeping Pad
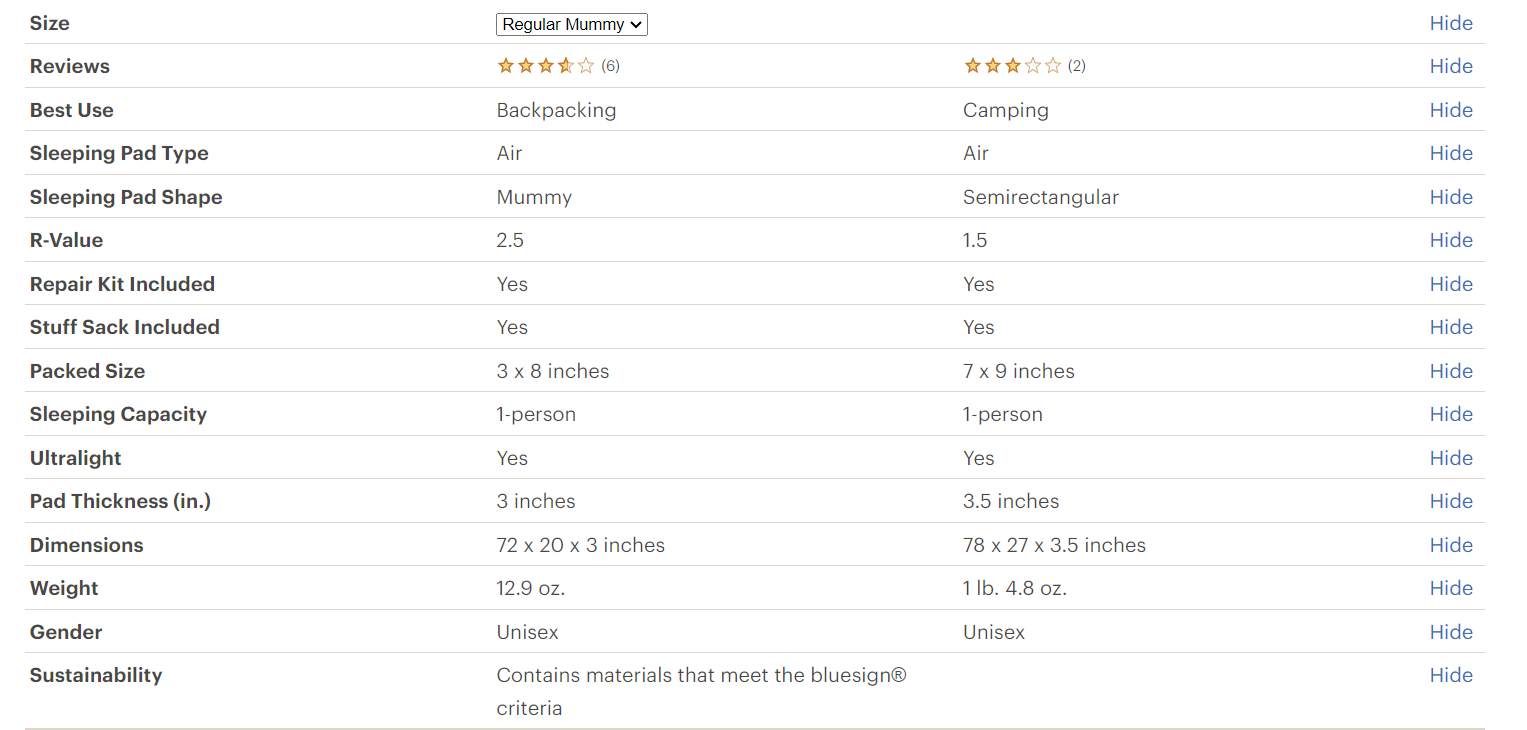
OMG is using a Klymit brand sleeping pad. I will cut him a little slack here because I don't think there is a less expensive option out there that would be better. However, I do think there are much better options that would be more comfortable, lighter weight, and warmer. The downside is they will cost more. I don't know which specific model OMG has there, but on the REI website, this is the model they currently have. I suspect it's being discontinued. It has a reputation for being a cold, uncomfortable pad. It has two reviews on REI and the average is 3 stars.
Sleeping pads' insulation is measured with R-Value. That Klymit pad from REI has an R-Value of 1.5 and weights 1 lb 4.8 oz. The regular retail price of the Klymit was $139.99, but it's on clearance for $83.
Nemo has come out with a new lineup of their Tensor brand pads. The low-end model is the Tensor Ultralight. It's currently listed at $189.95 for the Regular Wide version. It has an R-Value of 2.8 and weighs 1 lb 1 oz. As of the time I am writing this, you can also find last year's models of the Tensor on clearance because they are trying to move them to make room for the new models. Here is a side-by-side comparison page with the Klymit and the old model of the Tensor Ultralight.
I currently have the Nemo Tensor All-Season. It costs $229.95, has an R-Value of 5.4 and weighs 1 lb 3 oz for the regular wide size.
This is a well-designed upgrade on the Tensor
The Sandals
OMG packs heavy water shoes. I do not pack water shoes. I am not 100% sure what he is using, but they look something like these Tevas.
If so, they cost around $100, though this model is on clearance for $82.73 right now. They weigh a whopping 1 lb 12.6 oz for a size 9. Yikes.
If I have a wet crossing, I cross in my shoes. I use trail runner type hiking shoes. They dry more quickly than boots. They also have better traction than water shoes, so if there are algae covered slick rocks in the river or creek I am crossing, I have the best possible traction to help prevent me from slipping. When I get to camp, if my feet are still wet from the hike, I can put on my dry socks. I do have a pair of super light weight camp sandals.
Mayfly Ultralite Sandals
These sandals cost $38.99 and weigh 2.5 ounces (70 g). They are not rugged. They have no traction. They are made for light duty, walking around a campsite. They allow me to take off my hiking shoes while I go about making dinner and doing other small camp chores. I stash these in that outside pocket as well, mainly because if they do get wet, it's not going to hurt them, and I can dry them off with a camp towel.
In addition to being way heavier (probably close to an extra pound), carrying and using water shoes for water crossings takes a lot of extra time. You have to take off your shoes and socks, put on your water shoes, cross, stop again to remove your water shoes, dry your feet, then put your socks and shoes back on. I'd be a quarter mile ahead of the person doing that, and there are some trail sections where you have multiple wet crossings in a row.
On top of that, there are a lot of situations when your feet are wet anyway because there is dew on the grasses, the trail is just generally wet, and/or you thought you could dry cross by rock hopping a creek and you step in the creek because you missed your step, a rock you thought was stable rolls, or you just trip or lose your balance. Wet feet is frequently a part of backpacking. It is possible to avoid it, but only for just so long. You may as well "embrace the suck" as the saying goes.
Water Filter System
OMG and I are using the same filter, though he never shows the actual filter going into his pack in the video for some reason. We're using the Sawyer Squeeze.
What we do see him put into his pack is the Sawyer Squeeze water collection bag that is used to collect dirty water from your wild source.
My gripe here isn't that he's using something heavy or expensive. The complaint on this item is that it's terrible from a functional standpoint. Very few people use these, even though that's what comes with the Sawyer Squeeze water filters. The opening for that collection bag is the same size as a small water bottle. If you have a deep pool of water in your river or creek or pond, okay, it's going to take a while scooping the water repeatedly, but you can get it done. If your water source is shallow, it's going to be very difficult and you may need to scoop with your cook pot or other container, then pour into your collection bag, then filter. It's ridiculous. Like I said, these come with your filter, so there is zero extra cost when you pay for the Sawyer filter. They weigh only 29 grams.
A far superior alternative is the CNOC Vecto water bag. The CNOC Vecto has an opening on both ends. The opening on the top in the photo below can open the entire width of the bag, which makes it super easy to scoop water into the bag. If your source is flowing at all, you need to maybe scoop once or twice and it's full. In the best of scenarios with the Sawyer bag, you need to scoop multiple times and the capacity of that bag is only 1 liter whereas the CNOC bag is 2 liters.
The Vecto costs $22.99 and weighs 77 g, but the quality-of-life difference is well worth the marginal weight and cost differential.
If you are having trouble visualizing how these collection bags work and you're curious, here is a video.
Another advantage of the CNOC bag is that you can set it up as a gravity filter system, so it filters your water for you while you do something else.
CNOC rigged to gravity filter into a bottle.
Not only does the CNOC save time collecting the dirty water to filter, but it can filter while you do other things.
All Gear Comparison
I converted all the weight measurements into grams from a mishmash of pounds with decimals and some with pounds and ounces. Grams simplifies things and allows you to see apples for apples.
In this table, I have even included the most expensive and heavier sleeping pad option I shared above. The two items on my list that are more expensive than OMG's are the water filter bag and the sleeping pad. Both of those items are significant quality of life upgrades from what he was using, and my list still comes in at half the weight and about $75 cheaper.
Converting from grams to pounds, the total of OMG's items I have highlighted is 10.28 lbs. My equivalent items in pounds: 5.12 lbs. On the whole, they cost less, and improve my experience on the trail.
Really, that young guy has a lot more trail miles and experience than me. In the introduction, he says that he hiked the whole Pacific Crest Trail, which is 2,653 miles long, and he apparently did it with his heavier and more expensive gear, so good on him. I have covered a small fraction of that distance on undoubtedly less rugged trails. The point here is just that there are some great alternatives to the gear you can buy at Bass Pro, REI, or even your local outdoor outfitter.
Those are my thoughts on this subject. Do you agree with my gear options? What do you use that is different? Let me know!


%20Using%20CNOC%20Bag%20&%20Sawyer%20Squeeze%20Appalachian%20Trail%202022%20-%20YouTube.png)


Comments
Post a Comment