Early in 2023, when I was investigating shelter options, I was persuaded that a tent would be a better option for me because they are simpler and faster to set up. There are absolutely advantages to simplicity. The fact that you can pitch the Durston X-Mid tents with four stakes, pop your trekking poles into the doorways, and you're covered is a nice feature. But there is a part of me that also likes subtlety, nuance, and skill. Putting up a hammock and tarp takes a bit more know-how. It also has more options and flexibility. And when the hammock and tarp are hung, I have a seat where I can cook or relax and watch a sunset, I have a comfortable bed, and I don't have to crawl on my hands and knees to get in.

The video above shows how to tie a becket hitch. I think this was one of the videos I watched to learn how to tie the knot. The thing about this video is that he's tying it upside-down. The loop that he has attached to the wall represents the suspension for your hammock. I think this was possibly what I got wrong. The loop I needed to make and to pass through was under the whoopie sling suspension, not on top of the tree strap.
If you tie a marlin spike, you can hang your hammock suspension just above the peg on the knot (apparently if you try to hang it on the toggle itself, your suspension can slip off and you end up on your butt). The marlin spike is essentially a slip knot where you cinch down on the slip loop over a toggle or peg of some kind. If you have ever learned to tie a slip loop, you can tie this knot. Because the loop is resting on top of the knot, the loop can slide when you need to adjust the length of your whoopie sling. I don't think I realized it before trying these knots myself, but this is why the marlin spike is frequently mentioned when someone is talking about whoopie slings, and when people are demonstrating a becket, they are not demonstrating with a whoopie sling.
The marlin spike was also the knot I resorted to when the becket hitch failed me on that first practice hang. The drawback with the marlin is that you have to either find or carry a toggle. A stick will do, but finding a stick is another chore. Sometimes all the sticks lying around are wet and soft. Sometimes they aren't the right size. Also, if I'm dangling from this all night, I want to make sure I've got something solid so I don't fall two to three feet on my butt in the night. For that reason, I will be carrying a pair of two inch Titanium Toggles that are made for this purpose. I tried to avoid it, but this seems to make the most sense to me. These toggles weigh around 0.1 oz (3g) each. I'll deal with it.
%20-%20Hammock%20Hardware%20_%20DutchWare.png)
%20-%20Hammock%20Hardware%20_%20DutchWare.png)
I have also used a marlin spike as a brake knot for my bear hang, and it can also be used to hang a backpack or other gear on a tree to keep them off the ground. It's a knot with many uses that can be tied and untied very quickly and easily. Three cheers for the marlin spike.
There is a more secure version called the double fisherman's bend, but I haven't found that to be necessary (yet). If I am awakened during a storm because my tarp has collapsed on me because my single fisherman's bend has given way, I will undoubtedly change my mind. Haha.
The fact that the working end (colored red in the diagram above) of the knot ends up inside the loop makes me nerpy. I just think it's gross. The end of your line does not belong on the inside of your loop. It's a purely aesthetic preference. I prefer a variant called the Dutch or cowboy bowline.

The image above is a perfect example. It shows a bowline loop that is lashed to a tarp gromet using a larks head. From that lash point, you tie the other end to a stake (maybe using a marlin spike), and your tarp is secure.

These Tarp Ticks are about as long as the diameter of a quarter and two of them on my food scale do not even weigh a gram, so a tiny, tiny fraction of an ounce. I have tied my Tarp Tick on this starting end of my ridgeline on the end of a bowline loop. I wrap that end around the tree and join it to the other end and do a wrap around the top to cinch it down and the line is secure on the first tree. Here is an image. This is slightly different that my use, but it should give you an idea.

In the image above, they secured the short end of the tarp tick using the cinching peg on top and they used the hook to secure the long end. In any case, it works to secure one end of your ridgeline. Meanwhile, on the other end, you need a way to pull your ridgeline taut.
Trucker's Hitch
The Truckers Hitch is the most complicated of the knots so far and there are endless variants on it, but it's not really that difficult to learn, especially if you have some of these other knots mastered, and it does its job well. It allows you to tie off and tension your ridgeline. If you tie it with the easy release variants, it's also super easy to untie when you're ready to take it down.
Seriously...

If your prusik loop gets worn out, you can easily replace it. The fact that you can just pull the end and the whole thing pops loose to take it down... What is knot (one pun. It was time.) to love?

That is called an overhand knot. Now, instead of pulling that end all the way through, you only push a bite through the end like this.
That's a slippery half hitch. If you're not lashing it around another thing, it's technically a slip knot.

This post is my reflections on things I have learned about setting up a hammock after setting my hammock up with a specific focus on the knots and a few pieces of hardware.

If you are interested in the reasons I have decided to give hammock camping a try, click here.
I'm also not going to go into depth on all the components involved in a hammock setup again on this post, so again, if you aren't familiar with hammocks and you want to follow along, you might do well to start back on that previous post about hammocking. Here's the link again.
At the point I am writing this, I have done a couple of practice hangs, and I have learned a lot. I am enjoying the process.
How I Hang
My hammock is a bridge hammock from Warbonnet, called the Ridgerunner. I opted for a whoopie sling suspension and six foot tree straps. The straps are what you wrap around the trees, but you have to attach your tree straps to your hammock suspension. You can do that with hardware, but to me, not having the hardware means I'm not carrying those extra ounces, and it's also one less thing I might lose or break. Knots don't weigh anything and learning them is also kind of fun. Here is some of the knot fun I have learned.
Becket Hitch
I watched a bunch of videos on hanging hammocks, and one of the popular knots to connect your suspension to your straps is called the becket hitch knot. My first couple of attempts to tie the becket hitch were failures. I'm not sure exactly what I got wrong with it, but it didn't support my weight, and as soon as I tried to sit in the hammock, the knot would slip and give way. That was my first attempt at hanging. I knew another knot (which I will talk about in a bit) and I was able to execute that second knot successfully. But I wasn't ready to give up on the becket hitch yet.
The video above shows how to tie a becket hitch. I think this was one of the videos I watched to learn how to tie the knot. The thing about this video is that he's tying it upside-down. The loop that he has attached to the wall represents the suspension for your hammock. I think this was possibly what I got wrong. The loop I needed to make and to pass through was under the whoopie sling suspension, not on top of the tree strap.
After that first practice hang, I reviewed more videos and did some more practice knots at home. I returned to the trees in the park to do another practice hang. This time I got the becket hitch right and it easily took my weight. However...
The problem with the becket hitch is that it binds on the loop it is attached to. The suspension I am using is a whoopie sling. A whoopie sling allows you to adjust the length of the loop to fine tune the height of your hang. But the end of that loop needs to be able to slide through your attachment point, otherwise you cannot adjust it. The becket hitch is a nice knot but won't work with my whoopie sling suspension.
Marlin Spike
The marlin spike is fast becoming one of my favorite knots. It's simple and quick to tie, it ties securely, and it can be undone in a fraction of a second. The downside of the marlin spike is that it requires a toggle of some kind or other; it can be a stick, a tent stake, or some kind of short rod.
 |
| https://www.101knots.com/marlinspike-hitch.html |
If you tie a marlin spike, you can hang your hammock suspension just above the peg on the knot (apparently if you try to hang it on the toggle itself, your suspension can slip off and you end up on your butt). The marlin spike is essentially a slip knot where you cinch down on the slip loop over a toggle or peg of some kind. If you have ever learned to tie a slip loop, you can tie this knot. Because the loop is resting on top of the knot, the loop can slide when you need to adjust the length of your whoopie sling. I don't think I realized it before trying these knots myself, but this is why the marlin spike is frequently mentioned when someone is talking about whoopie slings, and when people are demonstrating a becket, they are not demonstrating with a whoopie sling.
 |
| Hind sight |
%20-%20Hammock%20Hardware%20_%20DutchWare.png)
%20-%20Hammock%20Hardware%20_%20DutchWare.png)
I have also been using marlin spike knots to tie stakes to the guy lines on my tarp. I have also seen people use a marlin spike to lash their guy lines through their trekking pole to raise one side of their tarp (commonly known as "porch mode").
 |
| Trekking poles can be secured using marlin spike |
I have also used a marlin spike as a brake knot for my bear hang, and it can also be used to hang a backpack or other gear on a tree to keep them off the ground. It's a knot with many uses that can be tied and untied very quickly and easily. Three cheers for the marlin spike.
Skip to the 5-minute mark if you just want to see the marlin spike used for a bear hang.
Fisherman's Bend
The fisherman's bend knot is a way to tie ends together. You can join two separate cords, or you can join the ends of the same cord together to form a loop. The latter is the application I am using it for. Here is a video that shows how to tie it.
There is a more secure version called the double fisherman's bend, but I haven't found that to be necessary (yet). If I am awakened during a storm because my tarp has collapsed on me because my single fisherman's bend has given way, I will undoubtedly change my mind. Haha.
There are other ways to make a fixed loop, but this is the way I have chosen to make my loops. I use these to create prusik hitches, which I will talk about next, but I am also using fisherman's bend loops for a pull cord on my tent stakes. This is a simple knot to tie, but I only use it for more permanent applications because it can be a little trouble to untie.
The primary use for my fisherman's bend is to make a loop for making prusik hitches.
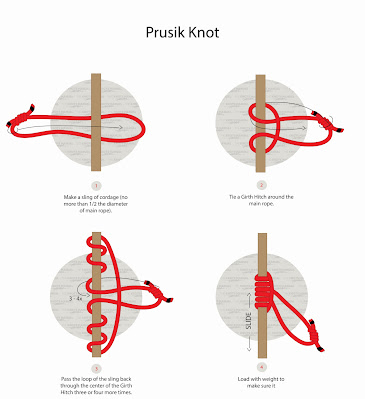
Prusik Hitch
The cool thing about a prusik (rhymes with "rustic") hitch is that it lashes onto another length of cord, and it can slide back and forth along the cord when there is not tension applied to it, but when there is tension on the knot, it will not slide laterally on the other line. It locks in place when tension is applied. Prusik hitches are also super easy to tie and to untie. So, where are they used for setting up a hammock?
The most common use for prusik hitches is to hang your tarp from a continuous ridgeline. Many (maybe most?) tarps come with loops or rings on the far ends. You can clip those rings or loops to prusik loops attached to a straight ridgeline stretched above your hammock to the same two trees from which you hung your hammock. Once the tarp is hooked to those prusik loops, you can center it over your hammock and pull it taut.

There is another application for the prusik hitch that I recently learned, and I will share it below. It is incorporated into another knot application to hang the ridgeline.
Bowline Knot
The bowline is one of the first knots people learn when they take a course on knots. It is a fixed loop knot that is relatively easy to tie and can be untied, even when it has borne a heavy load. It has taken me a while to warm to the Bowline, and I still don't like the standard bowline knot. I use a variation. Here is a diagram of the standard bowline.
 |
| Bowline diagram from Wikipedia |
The fact that the working end (colored red in the diagram above) of the knot ends up inside the loop makes me nerpy. I just think it's gross. The end of your line does not belong on the inside of your loop. It's a purely aesthetic preference. I prefer a variant called the Dutch or cowboy bowline.
 |
| Classic bowline on left, Dutch bowline on right |
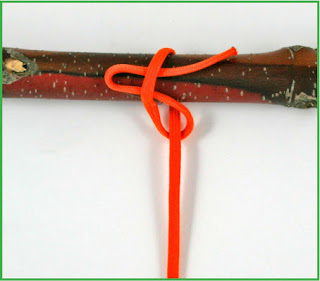
Dutch bowline puts that working end on the outside of the loop, but still has all the same properties of being able to tie and untie, even after it has borne a load. Like the prusik, the main reason I use a bowline knot is to do something else. The most common next step is a lark's head (sometimes called a cow hitch)
Larks Head
A larks head knot is a way to lash a length of cord to something. It's essentially a prusik, but with only one wrap instead of multiple wraps. I use a bowline loop with a larks head to lash my guy lines to the D rings on my tarp.
A larks head knot is a way to lash a length of cord to something. It's essentially a prusik, but with only one wrap instead of multiple wraps. I use a bowline loop with a larks head to lash my guy lines to the D rings on my tarp.

The image above is a perfect example. It shows a bowline loop that is lashed to a tarp gromet using a larks head. From that lash point, you tie the other end to a stake (maybe using a marlin spike), and your tarp is secure.
But talking about guying your tarp out before hanging the ridgeline is really putting the cart before the horse. I have saved the ridgeline for last because it makes use of several of these knots in combination.
Tarp Ridgeline
Before diving into the knots, I thought it would be a little helpful to describe what I'm talking about. The purpose of the tarp is to have a canopy over your hammock to protect you from wind and precipitation. You need your tarp to be stretched beyond the ends of your hammock so you are protected, even from blowing precipitation. To secure my tarp, I am stretching a length of cord all the way over the top of my hammock and lashing it to the same two trees I have hung my hammock from (or if it's raining when I setup, I will hang the tarp first, then the hammock, so the same two trees from which I will hang my hammock). This is known as a continuous ridgeline. There are a variety of ways to tie those ends to your trees, but here is how I do it.
Tarp Tick
You can only hang one end of the continuous ridgeline at a time. On my starting end, I am using a tiny piece of hardware made by Warbonnet, called a Tarp Tick.


In the image above, they secured the short end of the tarp tick using the cinching peg on top and they used the hook to secure the long end. In any case, it works to secure one end of your ridgeline. Meanwhile, on the other end, you need a way to pull your ridgeline taut.
The Truckers Hitch is the most complicated of the knots so far and there are endless variants on it, but it's not really that difficult to learn, especially if you have some of these other knots mastered, and it does its job well. It allows you to tie off and tension your ridgeline. If you tie it with the easy release variants, it's also super easy to untie when you're ready to take it down.
The basics of the trucker's hitch are a fixed loop of one kind or other tied in the line between the two trees, but near the end you are finishing on (not near the tree where I have secured the line using my Tarp Tick). Once you have your fixed loop in the line, you take the other end around the tree, then pull your working end through the fixed loop. This allows you to pull the line tight. Once you have pulled your ridgeline tight, you can tie off the end and if you have tied it off securely, it shouldn't slip.
The variants come into play with the fixed loop that is used at the start (a popular knot is a slip loop, but where the end that would slide is pulling on itself so it doesn't collapse while you're pulling on it to tension your line, but pops out of the line when you're ready to take it down), and also your finishing knot; half hitch, slippery half hitch, some people run the working end through the fixed loop twice, which allows you to put tension on the line, and it holds the tension when you let go, then you can do a half hitch to finish.
But with all the variants I have seen, using a prusik loop as the fixed loop, then using a slippery half hitch on the loop itself is my favorite. Below is a video where I learned this method and when I saw and understood what he's doing, it was one of those mind-blowing moments. This is brilliant. It's almost 11 minutes long, but if you just want to see his demonstration of the trucker's hitch with the prusik and half hitch as I have described it, jump to the 9:14 mark. But he also does a very good job before that showing the basics of the trucker's hitch and how it has been traditionally done with the slip knot and other variations.
Seriously...

If your prusik loop gets worn out, you can easily replace it. The fact that you can just pull the end and the whole thing pops loose to take it down... What is knot (one pun. It was time.) to love?
I suppose I should talk about a slippery half hitch since it is mentioned in the video, and I have mentioned it.
Slippery Half Hitch
This is essentially just a slip knot. Think about the simplest knot you can tie where you cross two ends over each other, then pull the end through.
This.

That is called an overhand knot. Now, instead of pulling that end all the way through, you only push a bite through the end like this.

That's a slippery half hitch. If you're not lashing it around another thing, it's technically a slip knot.
There are a couple of other knots I have learned, but these are really the foundational knots I have learned, and I can do everything I need to do to set up my hammock with what I have shown here, plus some variants, like porch mode on my tarp.
I hope you have found this useful and/or interesting. It's fun for me to document my journey. I'm sure as I get more experience with hammock camping, I will learn new little tricks and nuances about the setup. If so, I will undoubtedly share them here.
Thanks for stopping by,
Gavagai

Comments
Post a Comment