I haven't had many opportunities to do much backpacking recently, but I have been making some small adjustments to my hammock kit. In case you were not aware of the type of hammock I am using, it is a Ridgerunner made by Warbonnet. Here is a link to a previous article where I go into detail about the hammock itself and the first components I started with. The remainder of this article will be about the small changes I have made to the hammock, suspension, and underquilt.
 |
| Ridgerunner bridge hammock |
Suspension Changes
The suspension I started with was something called whoopie slings and tree huggers. The tree huggers were very thin polyethylene material [UHMWPE] and six feet long. From the tree hungers, the whoopie slings attached to the hammock dogbones [two cords with spliced loops on one end that attach to the corners of the hammock where the spreader bars are located]. I used a marlin spike hitch on the tree huggers to connect the whoopie sling and the opposite end of the whoopie sling was attached to the dogbones using a larks-head knot.
If all that sounds like Greek to you, and you can't picture what the heck I'm talking about, here are a couple of good YouTube videos that show this kind of suspension setup. These are from the Shugemery channel. The guy is an excellent resource for all things hammock related if you don't already know about him.
Marlin Spike with Tree Huggers
Whoopie Slings
The benefits of that suspension system are that it packs up small and it's very light weight. However, the whoopie slings add several feet to the distance you need between trees for a proper hang, the hang felt very tippy to me, and I wasn't a huge fan of the polyethylene material that the tree huggers were made of. It would get bunched up and more like a rope than straps, which seemed more likely to cause damage to the trees and it also made any knots I put in it bind up super tight.
Becket Straps and Continuous Loops
I have replaced my whoopie slings and tree huggers with Becket straps and continuous loops. The becket straps are similar to the tree huggers in that they are straps that wrap around the tree, but they are much longer than the tree huggers. The tree huggers I had were only six feet long. The becket straps are 15 feet long. Most trees that I can reach around to wrap the straps are around six feet in diameter, so that leaves around nine to twelve feet to play with, depending on the size of the trees. The becket straps can be tied off to the continuous loops as far down the line or as close to the tree as I want, so there is a lot more adjustability with the distance between the two trees. With the whoopie slings, they are six feet at the shortest possible distance. The hammock itself is around six feet and six inches, plus around six feet for the dogbones. Whoopie slings meant the minimum distance I could hang between was around 25 feet. And when the trees are spread that far apart or more, you have to put the lashing around the tree as high up as you can or else you have to make your lines very tight to keep your butt off the ground. With the becket straps, the two continuous loops I'm using between the straps and the dogbones add about one foot on both ends, but six feet of hammock plus six more feet of dogbone length, plus the two feet for the continuous loops, as long as I give myself a couple of extra feet for tying off my becket hitch (the knot that is used with the becket straps), that's all I need. Realistically, I could probably hang comfortably between trees that were only 18 feet apart with this suspension system. That is much easier for me to estimate than 25 or more feet of distance.
So here is an image showing the new becket strap suspension.

For this particular hang, I wrapped around the tree three times. It's the first time I tried that. It uses up extra line and it also prevents the straps from slipping down the tree. The drawback with doing that is if you decide you want to raise it higher on the tree, it's much more difficult to adjust it.
The continuous loops are essentially just a circle of cord made by splicing the ends into the cord. I have a silver continuous loop on my foot end and a red loop on the head end. One end of continuous loop attaches to the dogbones with a larks head knot. The other end attaches to the becket strap. There are different ways to do it. The simplest way is to just run the strap through the loop, then tie it off with a becket hitch.
Here's another photo showing the other end with the dogbones. The big brown thing hanging on the strap is just the stuff sack. When I'm taking the hammock down, it all goes back into that stuff sack (...well, not the spreader bars or the underquilt, but the hammock and the suspension).

I bought the becket straps and continuous loops from dutchwaregear.com. The first continuous loops I bought were the shorter eight inch loops. They would work, but in addition to the larks head knot I use to attach to the dogbone end, I also like to use a larks head knot on the end with the becket straps. The connection I have been using is similar to the one shown in this video, except that I'm just using the continuous loop and a larks head knot, and not a prusek knot on the strap.
That video is from Jeff Meyers channel. His channel is another great resource for information about different variations you can do with suspension and spliced applications.
Here is a photo showing the way my continuous loop is linked to the becket strap.
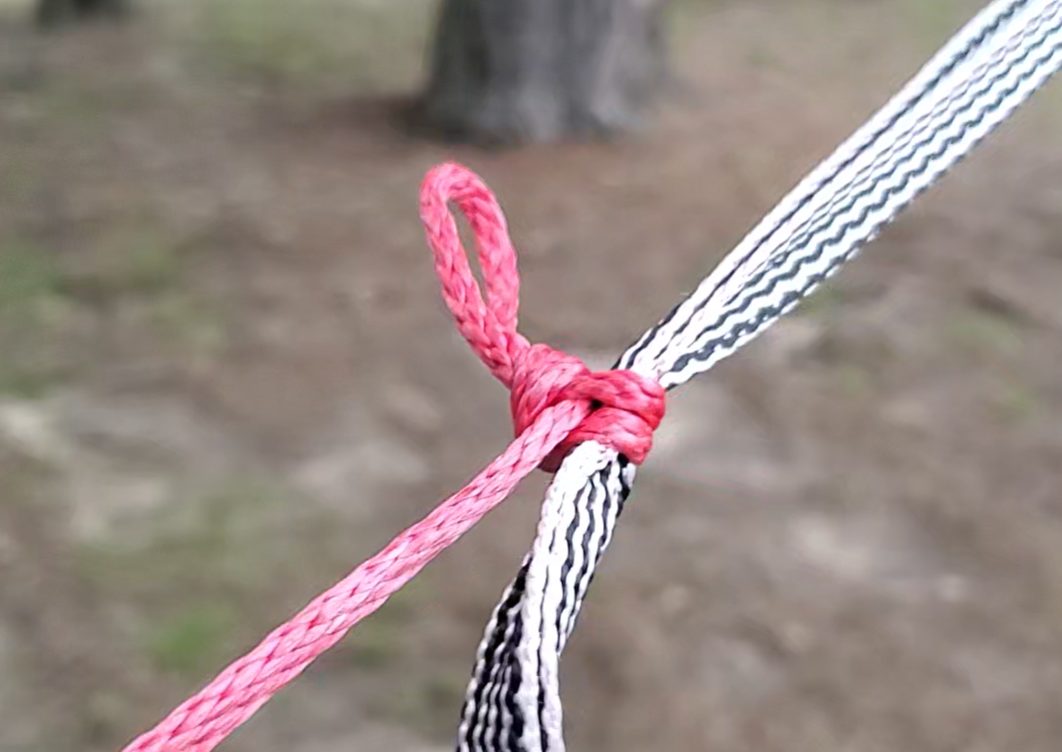 |
| The larks head on the strap without the becket hitch. This knot can slide up or down to adjust the distance. |

In the photo above, you can see the difference in sizes between the eight inch loop and the 15 inch loop. Having the extra length makes that additional knott on the end much easier to make. You can see on the eight inch loop that the loop knot was small and got even smaller with use.
One last very minor observation about these continuous loops from Dutchware. I have found that the red Amsteel bleeds the color a bit. The pink stain on the strap is barely perceivable in this photo, but it's there. I think you can also see a bit of the fading on the loop. This is not a deal breaker for me, but it is a minor annoyance.

Under Quilt Attachment Upgrade
The carabiners that came with the Lynx underquilt from Warbonnet are lightweight and small, but on two separate trips, one of the corners popped off because the wiregate on the carabiner got twisted and didn't hold. On my most recent trip, I repeatedly woke up with a cold thigh. For that reason, I have replaced the manufacturer carabiners with some more robust biners. I haven't tried it in the field yet, but I think these new biners will hold for me.

Bugnet Hooks
There is a built in bugnet with the Ridgerunner hammock. It's getting warm enough now that I have been using it. The bugnet is suspended using bungee cord that hooks onto itself after looping either to the tree or to the suspension. The manufacturer includes plastic mitten hooks. I found the gate on those mitten hooks annoying, so I swapped them out for these titanium hooks from Dutchware.

Yes, that's how small they are. That is nice because they pack tiny and weigh nothing, but also I managed to lose one on the first trip I took with them. The loop knot I used to secure the hook to the bungee was not secure, and when the bungee popped off the hook, the bungee went flying back toward the hammock and the hook completely disappeared in the leaf litter on the forest floor. I was sad. Fortunately, I wasn't sure I was going to like these hooks, and I brought the mitten hooks along for the trip, just in case. I have since replaced the lost hook, and I have improved the knot that holds it to the bungee.
 |
| The hook at work |
 |
| Bugnet deployed |
Zipper Pulls
The bugnet has two sets of zipper sliders that run from the foot end all the way around the hammock. The zipper sliders that were installed are fine, but finding the pulls in the night can be a little challenging, so I added some cord to make the zipper pulls a bit easier to find and grab. Here is what that looks like.

The zippers have pulls on the outside (shown in the photo) as well as the inside because you need to be able to open from inside and outside of the hammock. I added these cords to the pull on both sides and for both zipper sliders.
Warm Weather Top Quilt
The top quilt I have been using is a 20° F quilt. That temperature rating has worked great for me, both in my hammock and in a tent for the winter and even shoulder season nights. But in 50° and warmer nights, that's way too warm. I ordered this "Quillow" from UGQ.

The top is that hex-cam pattern and color. The underneath is purple. You can pick other colors. I liked these color combinations, and I like it with my blue hammock and yellow underquilt. This quilt packs down tiny and weighs just under a pound. This is the Deluxe size. I almost ordered the Junior size because I didn't think I would need the width of this Deluxe size, but the Junior would have been too short for me. This is the newest piece of my kit and I haven't been able to take it on any trips yet. Looking forward to testing it out soon.
I will add that UGQ is a US based company and they manufacture their quilts here. They use ethically sourced down (not plucked from live birds that causes them pain and suffering). But they did take more than a month to ship this. Don't expect to have your quilt ordered and shipped in a week in spite of what their website says.
 |
| Lies |
The week shipping only applies if you purchase one of the stock Quillows, not a customized one where you pick the colors and fabrics.
Spreader Bars
I think I may have already mentioned these in a previous article, but since I'm going over all these other upgrades, I'll talk about these two items as well.
First, I have upgraded from the manufacturer spreader bars to carbon fiber bars from Ruta Locura. They almost cut the weight of the spreaders in half. I probably say this every time I talk about it, but it's true. Warbonnet is dumb for not offering these as an upgrade when you purchase your hammock from them.
The other upgrade I made was tarp protectors. I won't go into detail about those because I have an entire article about them and my initial attempt to do DIY protectors. Here is a link to that previous article. They are called Pole Guardz by a company called Nama Gear.
 |
| Pole Guardz and carbon fiber spreader bar (ignore the carabiner) |
I would like to revisit my tarp kit, but I think this is enough for today. The tarp upgrades will come in a future article.
Thanks, as always, for stopping by,
Gavagai

Comments
Post a Comment