These were going to be separate posts, but I'm combining them because they are both short(ish) topics and I'm itching to get them both out. Writing it here saves my family and friends from listening to all of this!
Giving Back to the Trail
I know I appreciated when passage through the Ouachita Trail (OT) was not made difficult by obstructions. It was also nice when the trail wasn't overgrown with tall grasses that get your pants and shoes wet and often hold tics waiting for a ride and a meal.
When I hiked the OT, I made a donation to Friends of the Ouachita Trail (FoOT) to help them maintain the trail. This fall, I also opted to help with a couple of FoOT's trail maintenance events. The first event was at Lake Sylvia. Volunteers were divided into several groups to do maintenance on various sections of the trail in the area. The group I was with cleaned up the two miles between Flatside Pinnacle and Crystal Prong Creek in the Flatside Wilderness area. Because this section of the trail is within the boundaries of the designated wilderness area, no power tools can be used. Our group had hand saws and loppers. For other sections, volunteers could use gas powered weed eaters and chainsaws to clear away tree falls and grassy overgrowths.
 |
| Volunteers being organized at Lake Sylvia |
Even though these events can definitely involve some hard work, you're in the woods on the trail, and you get to meet other people who also love the trails and forests.
I participated in a second event this past weekend, this time on the western end of the trail in the Kiamichi Wilderness. I used a swing blade to clear out grassy overgrowth. I have sore muscles as I'm writing this from swinging that blade for 2-3 hours in the Kiamichi valley. For this event, volunteers camped at Cedar Lake Campground.
I participated in a second event this past weekend, this time on the western end of the trail in the Kiamichi Wilderness. I used a swing blade to clear out grassy overgrowth. I have sore muscles as I'm writing this from swinging that blade for 2-3 hours in the Kiamichi valley. For this event, volunteers camped at Cedar Lake Campground.
Both events provided a couple of meals for the volunteers and volunteers camped for free at campgrounds that normally require fees. Lake Sylvia and Cedar Lake both have fantastic facilities with flush toilets and even hot showers. There are sites for RVs with electric and water hookups. At Lake Sylvia, we did an evening hike to North Fork Pinnacle to watch the sunset (beautiful). At Cedar Lake, we were invited to listen in to FoOT's annual meeting where they made a couple of exciting announcements about future developments on the trail.
 |
| Fire in the sky at North Fork Pinnacle overlook |
If you have hiked or backpacked on the OT, I urge you to give back in one way or another, whether it's through financial support or volunteering for events like these, or both.
 |
| Awesome people I got to meet and work with at Lake Sylvia. I'm in the orange pants. |
If you want to keep up with future events like these, you can follow FoOT on Facebook, you can also watch the official FoOT website. Donations can also be made through the FoOT website. The FoOT board is doing a great job coordinating with the US Department of Forestry, the hiking/biking community, and other stakeholders. It was great to get to meet some of them.
Hammock System Updates
I've been using a hammock kit instead of a tent kit for about six months now. I am getting more proficient at setting up my hammock and tarp and I learn things each time.
Tarp Pull Outs
The purpose of a tarp pull out mod is to open up the space under your tarp. See my photo below where I have circled the attachment points for the pull outs and I have highlighted the bars that extend over the top of the tarp to which cords from the pull out points have been attached to pull the tarp up and away from the outside.
 |
| Circles show attachment points. Lines highlight the speader bars. |
I mistakenly thought that the tarp I bought from Warbonnet came with pullout loops already installed on it. I think they used to do that, but they stopped because people were having issues with holes. It does put a strain on the silpoly material.
Even so, I wanted to try a pull out system. The very first thing I actually received in the mail for my hammock kit was a set of tarp spreader bars. I purchased them from Hammock Gear. I just noticed this, so I'll mention it here. Warbonnet does sell a pole set like this. In fact, it looks identical, but the HG version sells for $25 (for a pair) and the Warbonnet poles sell for $35 per pair. That's the reason I ended up buying these poles from HG instead of Warbonnet when I was buying most of my other hammock equipment from Warbonnet at the beginning.

Because the Thunderfly from Warbonnet didn't have pullout loops, I had to find an alternative solution to actually pull the tarp out and attach cording to the ends of these poles. For that purpose, I purchased Clip on Tarp mods from Dutchware.
%20-%20Dutchware.png)
You push the white ring from underneath the tarp, then clip the clip part around the ring. The cording is elastic shock cord. I have used it with the spreader poles shown above, and I have also tied them off to nearby trees. I have been tempted to cut the cordage to length for the poles, but having the extra length means I have more options for tie off points, and if I lose or forget to bring the poles, using trees to tie off the pull outs is still a viable option.
Also, the poles are a little challenging to connect using the shock cord. When you attach one side, you have to tie it loose enough to begin with so the weight of the pole pulls it down over the ridgeline to the side you haven't tied yet. If not, the shock cord pulls it down and it falls on the ground. So basically, you have to tie one side twice. You tie it loose to start, tie the opposite side with a bit more tension, then go back to the first side and tension that side. It's a bit of a nuisance, but it really does open the space under the tarp, which is nice.
If I figure out a more elegant way to set up the tarp pull outs, I will report back here.
Stake Upgrades
Probably the most popular tent and tarp stakes in the backpacking community are the MSR Groundhog stakes. I have used those for my tents for years, and those are also the stakes I started with for my hammock kit (because that's what I had). however, a few months ago, I decided to try something different. The second most popular stakes are MRS Mini Groundhogs. Instead of 7" stakes, they are 6". They weigh less, they are slightly shorter and smaller, but otherwise they are the same Y type design. But I didn't buy the MSR brand min Y stakes. Instead I bought 6" Sonic stakes by Zpacks.

No particular reason I went with the Zpacks apart from they were blue. I bought eight of them. I like them. So far I have had no issues. They penetrate into most ground types I have tried them in without issues. They seem to hold fairly well. There were a couple of instances where the soil was a bit loose and the winds were high. I double staked in one situation and in another situation I used some branches or rocks wrapped around the guy line in front of the stake point to help reduce tugging on the stake. Both strategies worked pretty well.
I also recently purchased purchased some 6" titanium shepherds hook style stakes from Zpacks just to try.

What I have decided is to carry four stakes of each kind. I have four 6" Sonic stakes and four 6" shepherds hook stakes. The shepherds hook stakes are lighter than the Y stakes, so I have reduced some weight while also giving me more options depending on the soil and wind conditions where I'm setting up.
One final upgrade for my stake set is a new stake stuff sack. I bought a Dyneema sack made by Hartford Gear off the Garage Grown Gear website.

I'm very happy with my stake set.
Guy Lines
I made the guy lines for my tarp kit using cordage that I happened to have lying around. The lines were different lengths and made of different materials. I found it annoying, so I purchased a couple of 50' hanks of blue cordage from Garage Grown Gear.

This cordage has reflective material woven into it. It's made by Lawson Equipment which is the same company that makes the bear line I purchased. This cordage isn't as slick as the bear line cordage, but that's probably good. The four guy lines for my tarp are now close to equal length and all made from the same type of material.
I will say that I am glad that I opted for the types of attachments I used for securing the original guy lines I made because it made replacing them relatively easy. I made fixed loops using Dutch bowline knots, then used that loop to larks head the line to the d-rings on the tarp. I did the same to attach the new guy lines.

The guy lines are a bit longer than 15' in length. That's more than I need in most cases, but it gives me the option to use nearby trees instead of stakes when there are viable trees. It also allows me to put one side up in "porch mode" using trekking poles. Oh, and longer cords also means I can use deadman anchors like rocks or tree limbs.
You can always tie things off using less cord on a longer line, but if you don't have enough cord to tie off to a more distant anchor point, you either have to combine cords or you're out of luck.
Pole Bag
I'm carrying a total of four poles with my hammock kit; a pair of spreader bars for the bridge hammock itself, a pair of tarp spreaders. Since I started hammocking, I've been using a stuff sack that came with my Leki trekking poles, but it was bigger than it needed to be and weighed more than it needed to as well. This pole kit stuff sack from Warbonnet is perfect.

All four of my hammock poles fit perfectly in this stuff sack. I made one adjustment to the stuff sack that I do with virtually everything I get from Warbonnet, which brings me to the next topic...
More Cord Lock Adjustments
The cord locks that come with Warbonnet gear are all obnoxiously huge and blocky. I hate them. All of them are far larger than they need to be and they are also boxy. I think they must have searched for the cheapest crappy cord locks they could find and bought them in bulk. It's a stupid small detail, but details matter.
 |
| Exhibit A |
As you can see from the photo above, the enormous cord lock on the left is the one that came with the pole kit stuff sack I discussed in the previous section. I replaced it with one from Zpacks that is a fraction of the size, has more rounded edges so it feels nicer to the touch, and it weighs 2 grams as opposed to 4 grams. While that's not a huge weight savings for one, there are two cord locks on the stuff sack, two cord locks for the bug net cordage, and one for a small loop that helps hold the head end of the hammock to the spreader bar. Cord locks need to be exactly as large as required to fit around the cordage they are locking. If your cord locks are larger than that, you're adding unnecessary weight for no advantage.
I have purchased three types of cord locks. I bought one type from Amazon, but they were only better than the ones from Warbonnet in that they were rounder and more pleasing to the touch. I bought "mini" and "tiny" cord locks from Zpacks, and those are the ones I'm using for most everything now.

The Amazon cord locks weigh just about as much, possibly more than the Warbonnet default cord locks. If they weighed less than the Warbonnet ones, I would have been satisfied with that upgrade, but most of my other gear comes with better cord locks than what Warbonnet did, so I knew they were out there. It just took me a bit to figure out where to get them. I saved ten grams with those replacements and a handful elsewhere. Shave a little here. Shave a little there. It adds up. I'm willing to take some weight penalties and use a thing that's heavier than an alternative item, but not if the heavier thing doesn't work better.
Small side track here because I was thinking about this other change to save weight. My tarp is made of silpoly. It's a Warbonnet Thunderfly 13'. It weighs around 19 ounces. A Dyneema 12' tarp would cut that weight in half (around 8 ounces), but costs $430. That's an example of something where I'm willing to take the weight penalty. I'm also using a snakeskin for my tarp because it makes it easier to set up but not fully deploy if I want to enjoy the sky on a clear day/night, makes it easy to deploy, and also makes it easy to take down. The snakeskin adds a small amount of weight, but it's a weight penalty I'm willing to pay for the convenience.
Oh! This is another upgrade to my tarp that I don't think I have mentioned on my blog anywhere yet.
Tarp Snakeskin
Tarps can be a challenge to manage. They are large, they flap around in the wind. They can be difficult to put into a stuff sack. Also, if it's nice out, you may not want to deploy your tarp so you can enjoy a view, but it's wise to put it up just in case weather arises. It's easier to do everything when you're not worried about your sleep system getting drenched. A tarp snakeskin helps with these issues. It's hard to envision without seeing one, so here is a video demonstration from the YouTubes.
I purchased my tarp snakeskin from Simply Light Designs. I opted for the end pockets. I don't know that I would do the same now. I don't really use them. I just cram my cord bundles inside the skin, but it's well made and worth the price and weight penalty. My setup is pretty much exactly like the one shown by Rob Pelton above.
Knot News
I have made a couple of small changes in the knots I'm using (or not using) for setting up my hammock and tarp.
Continuous Loop Updates (Alpine Butterfly Leverage Loop)
In a previous article, I provided some details on changes to my hammock suspension. Here are a couple of images from that article that will help to pinpoint the specific areas I have altered.

 |
| Small overhand loop was beginning to collapse |
In the second photo above, you can see the red cord that is my continuous loop that is tied to my becket strap using a larks head knot with a pull loop at the top to help loosen the larks head when it's time to adjust or take the hammock down. The issue I was having with this setup was that the loop at the top was just tied using a overhand knot loop. The loop was slipping and shrinking, so there was less to hold onto to get leverate to loosen the larks head. If you're confused about all this, here is a link to the previous article where I explain in greater detail and there is also a video linked to help show the concept.
Overhand knots also bind up and they can be very difficult to untie. When I tied it originally, I didn't think it would matter because I didn't know the knot would slip and the loop might shrink.
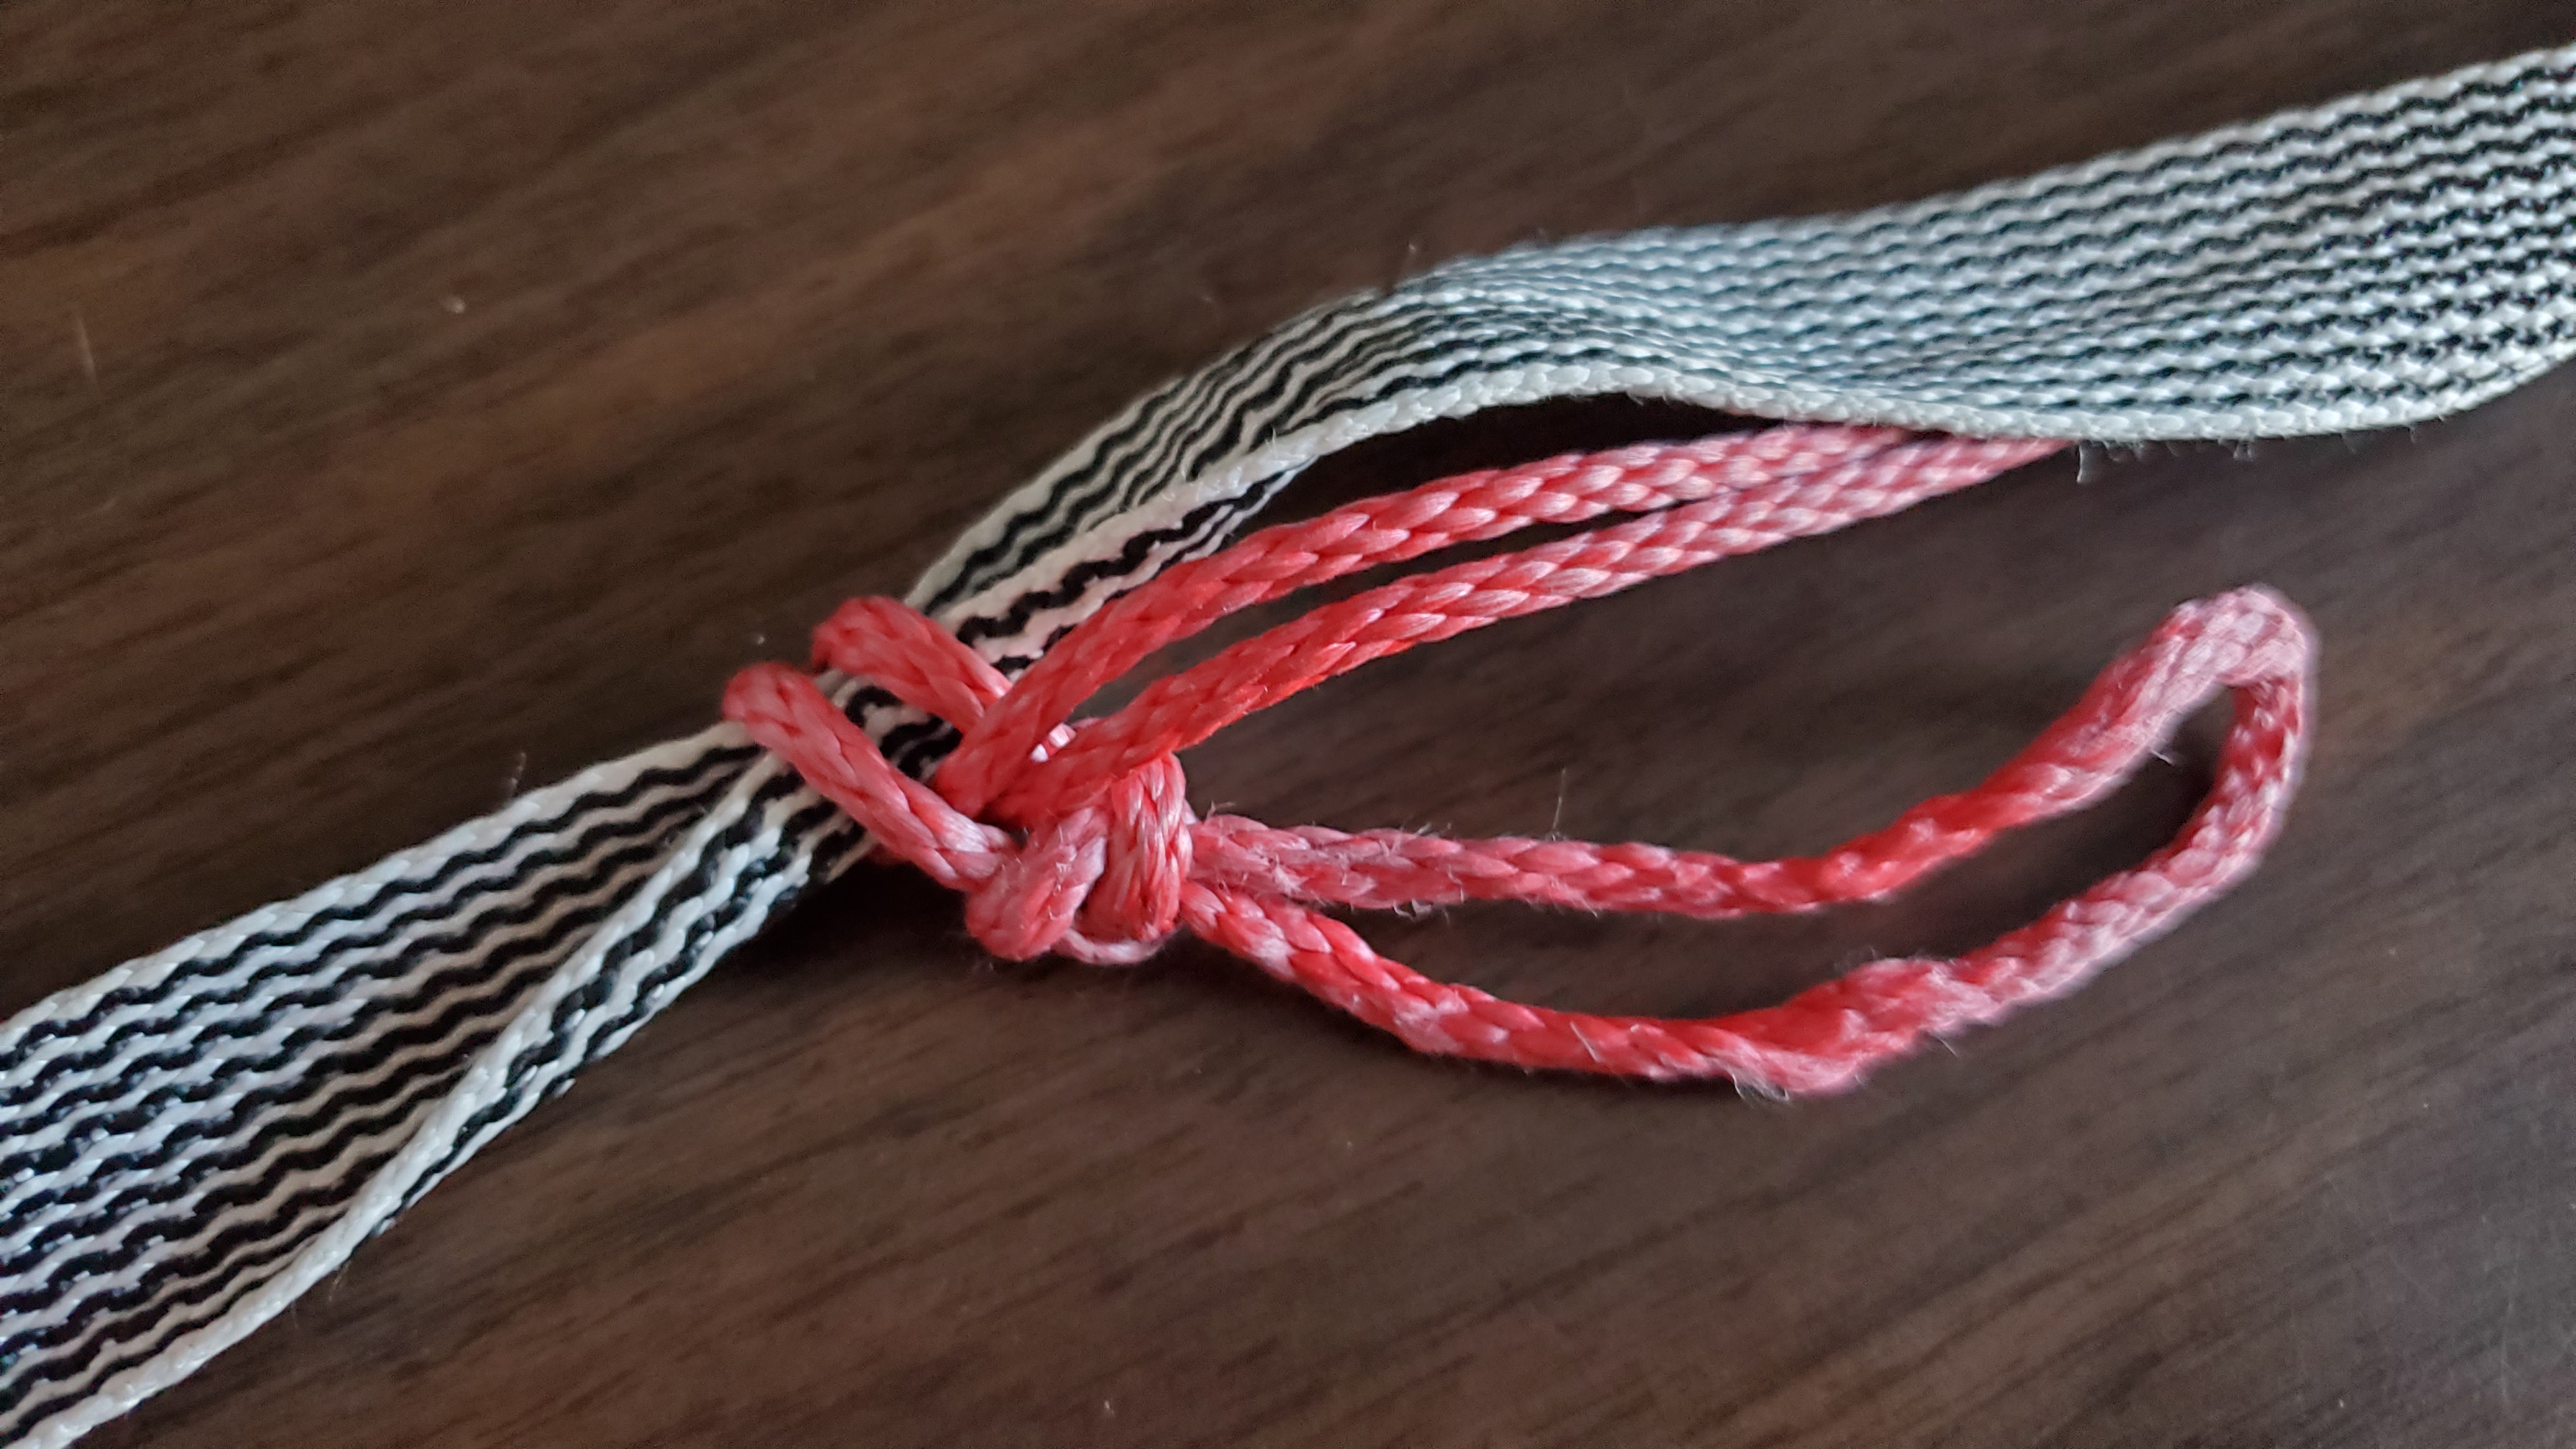
To address these problems, I pried apart the overhand knot using two sets of needle nose pliers. Then I tied an alpine butterfly loop. The alpine butterfly has become one of my favorite knots. It's a loop knot that can be tied midline. Because this is a continuous loop, there isn't an end I can access. It's essentially a ring of cord. The alpine butterfly is also less likely to bind up than an overhand loop. I have also given myself a larger loop to pull on. Hopefully all of these updates will improve the function and maintenance of the suspension.
 |
| Alpine butterfly loop to leverage the larks head knot |
 |
| Same thing, but the opposite side |
Becket Hitch Variation
I've also had issues with my becket hitches slipping. The becket hitch is typically tied with a loop below the continuous loop.

In the image above, it may be a little confusing, but imagine that the striped strap is going up to the tree and the red cord attaches to the hammock below. The becket hitch is where the strap is looped below the larks head and loop knot I discussed before.
This past weekend, I decided to try a variation on the becket hitch where I make the loop below, but I also wrap around and make a second loop above the larks head/continuous loop, then I push a bight through both loops. Here's a rough image of what that looks like before it's cinched down with tension.

This seemed to hold without slipping. I only used this variation on the head end of the suspension. The foot end seemed to hold without that additional loop. If this works out well in the future, I may do a video demonstrating it in more detail. But for anyone who knows how to tie a becket hitch, this will hopefully give you enough information to give it a try yourself.
Farrimond Friction Hitch
Up till now, I haven't used any line tensioning method for my guylines. All I've done in the past is tie a marlin spike on my stake, pull the line until there is a little tension, then stick it in the ground. That' works okay, but if you find that your line has slackened because your tarp had a bit of stretch or wind shifted things or for whatever other reason, you have to restake out your guyline. Sometimes real estate with soil where your stake can find purchase is lacking.
I decided I wanted to learn a couple of types of friction hitches. I successfully learned enough to try them out, but I ultimately liked the Farrimond Friction Hitch the best. Here is a video that shows how to tie them and how they function.
The Farrimond Friction Hitch can be tied midline. It's not super hard to tie, although it is a bit messy. It seems to hold well when it's dressed properly, and undoing it is extremely simple. This was a very useful knot to learn.
No More Truckers Hitch for Tarp Ridgeline
I really liked the idea of not using hardware to tension my tarp ridgeline. I really like knots. I have a whole article just about the knots I have learned and that I was using for my setup. The trucker's hitch is one of my favorite knots. The problem is that I'm using such thin and slippery cordage for my ridgeline, it made every variation of the truckers hitch I tested difficult to tie and prone to slippage. On the head end of my tarp ridgeline, I've been using a Tarp Tick (by Warbonnet). I'm just using it as a hook on that end to wrap around the tree. The other end is where I tension the line. That's where I've been using the truckers hitch. It occured to me that I own another tarp tick, so this past weekend, I decided to use the second tarp tick to tension my line.
 |
| Warbonnet Tarp Tick |
It's a tiny titanium line tensioning hook. Dutchware makes something similar called the Wasp. Here is a link to a video where Dutch demonstrates the Wasp for a ridgeline. I'm linking to the Wasp video because it's a clearer demonstration of the application I'm using the Tarp Tick for than the videos on Warbonnet's page about the Tarp Tick, and if you watch the Wasp video, I think you'll get a good idea of how it applies to the Tarp Tick. Honestly, I think the Wasp design is slightly superior to the Tick, but the Tick is smaller and I got three or four of them when I bought my hammock from Warbonnet. The Tick is less expensive than the Wasp and I think it's lighter. Confirmed. The Tick weighs 1 gram. Wasp weighs 2 grams. I'll stick with the Tick.
Prusik Frustration
My tarp is suspended from the continuous ridgeline using prusik loops. This is a great system except that the prusik loops slip because of that stupid slippery Dyneema cord. I have some thicker Dyneema that might resolve my truckers hitch slippage issue as well, but I'm not quite ready to pull the trigger on a full swap out ...yet. The result of the slipping prusik loops means that my tarp sags a bit in the middle. The prusik loops hang from each end, and they hold the the tarp ends to the ridgeline (using an S carabiner).
 |
| Red cord is the prusik loop. Yellow line is the continuous ridgeline. |
The knot experts recommend using a smaller diameter cord for your prusik loop than on your main line that you're tying it to. However, I have asked around and people say this should work. They recommended I add more wraps on my prusik loops. I've had slipping with four wraps. I just added a fifth wrap. Maybe that will do the trick...
Swinging Motion
This isn't really an update on equipment, but I figured I would mention it here. On my post First Try at Hammock Camping, I commented about the sensation of swinging in my hammock. I was unsure if I liked it. I can now report that I do actually like the sensation of swaying back and forth in my hammock. It often happens when you first get in as your weight shifts and you get yourself settled in the hammock. There have been a couple of times when, after I stopped swinging, that I intentionally initiated swinging again by either reaching down to the ground with my arm and pushing, or just shifting my body or legs a bit to get it moving. It like rocking in a chair. It's relaxing.
Well, that's all I've got for today.
Questions? Comments? Those are my thoughts. Share your thoughts. I've got a new adventure planned soon. I'll share the details here.
Thanks for stopping by,
Gavagai

Comments
Post a Comment